How to Manage Members in Your Workspace
What is Member Management?
Member management in a workspace allows you to control who has access to your research and what they can do. As a workspace Owner or Admin, you can invite members, assign roles, change permissions, and remove users who no longer need access.
Effective member management ensures:
- Right people have right access levels
- Research data remains secure
- Team collaboration runs smoothly
- Professional boundaries are maintained
Step 1: Access Workspace Settings
To manage members, you need to open your workspace settings.
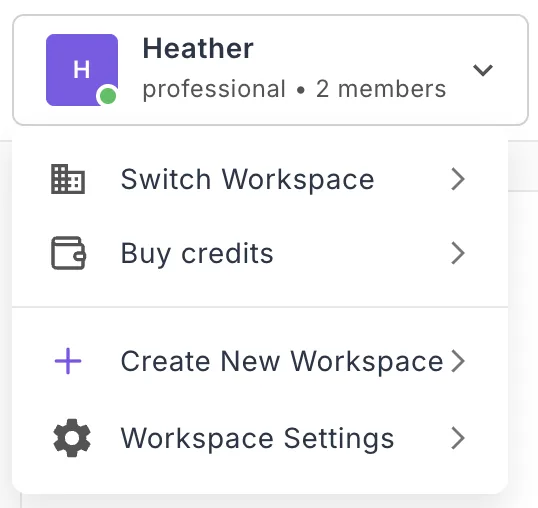
Navigate to Workspace Settings
- Click your workspace name in the top-left corner
- A dropdown menu appears
- Click "Workspace Settings"
- The Workspace Settings panel opens
Note: Only workspace Owners and Admins can access member management settings. Members and Guests cannot manage other members.
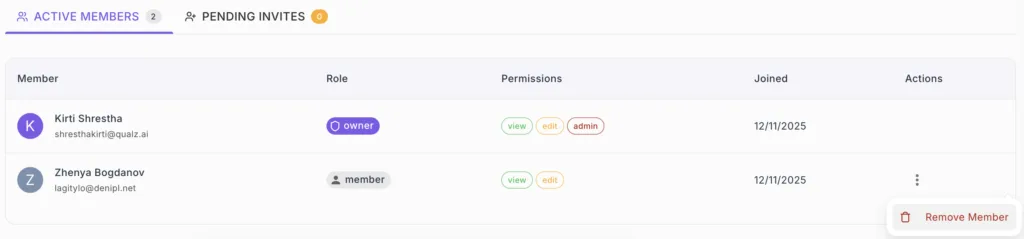
Step 2: View Current Workspace Members
Once in Workspace Settings, you can see all current members.
Understanding the Members Overview
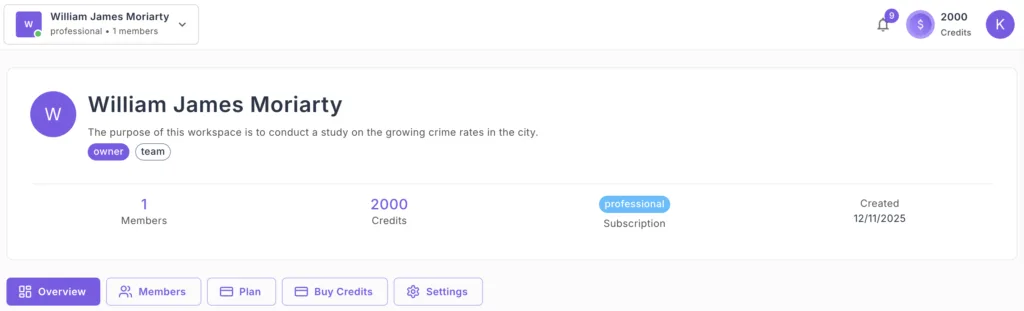
The workspace overview displays:
Workspace Information:
- Workspace name and type (Team/Enterprise)
- Your role (Owner, Admin, Member, Guest)
- Workspace tags (professional, personal, small)
- Total member count
- Current credit balance
- Subscription status
- Creation date
Workspace Owner Section:
- Owner's name
- Owner's email address
- Contact information
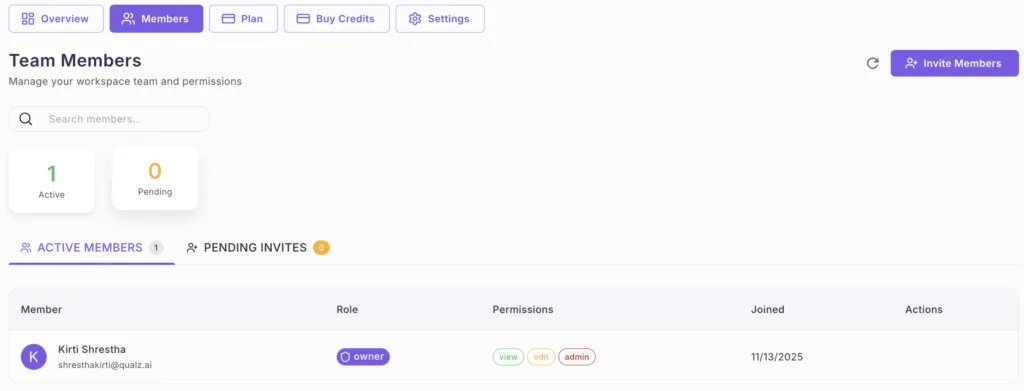
Navigate to Member Management
- Look for the "Members" tab or section in Workspace Settings
- Click to view the full member list
- See all members with their roles and permissions
Each member listing shows:
- Member name
- Email address
- Role (Owner, Admin, Member, Guest)
- Date added
Step 3: Understanding Member Roles
Before managing members, understand what each role can do in your workspace.
Owner Role
Full control over the workspace:
- ✅ Manage billing and subscription
- ✅ Delete the workspace
- ✅ Add and remove members
- ✅ Assign all roles (including Admin)
- ✅ Change workspace settings
- ✅ Create and manage all research assets
- ✅ Purchase credits
Limitations:
- Only one Owner per workspace
- Cannot transfer ownership without contacting support
Admin Role
Manages workspace operations:
- ✅ Add and remove members (except Owner)
- ✅ Assign Member and Guest roles
- ✅ Change workspace settings
- ✅ Create and manage research assets
- ✅ View all workspace data
- ❌ Cannot manage billing
- ❌ Cannot delete workspace
- ❌ Cannot remove Owner
Member Role
Creates and conducts research:
- ✅ Create surveys and interviews
- ✅ Run analyses
- ✅ Manage AI participants
- ✅ Add products and organizations
- ✅ View workspace data
- ❌ Cannot invite members
- ❌ Cannot change settings
- ❌ Cannot manage billing
Guest Role (View-Only)
Read-only access for stakeholders:
- ✅ View surveys and results
- ✅ View analysis reports
- ✅ Download shared reports
- ❌ Cannot create anything
- ❌ Cannot modify data
- ❌ Cannot invite members
- ❌ Cannot change settings
Ideal for: Clients, stakeholders, reviewers, observers
Step 4: Change Member Roles
Adjust member permissions by updating their role.
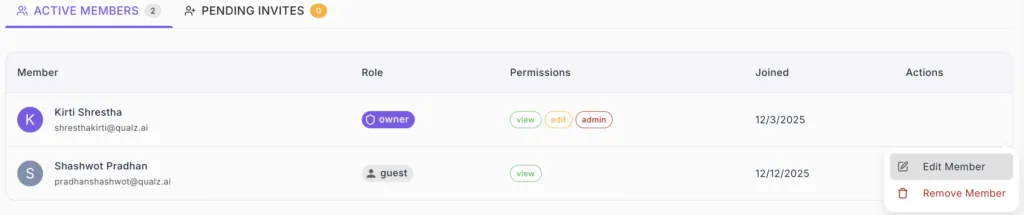
Open Edit Member Dialog
- In the Active Members list, locate the member
- Click the three dots icon (⋮) in the Actions column
- A menu appears with two options:
- ✏️ Edit Member
- 🗑️ Remove Member
- Click "Edit Member"
-
Click the "New Role" dropdown
-
Choose from available roles:
- Member – "Can create and manage studies"
- Admin – "Can manage members and workspace settings"
- Guest – "Can view studies"
-
Review the role description
-
The dropdown shows role badges in purple (Admin), gray (Member), and blue (Guest)
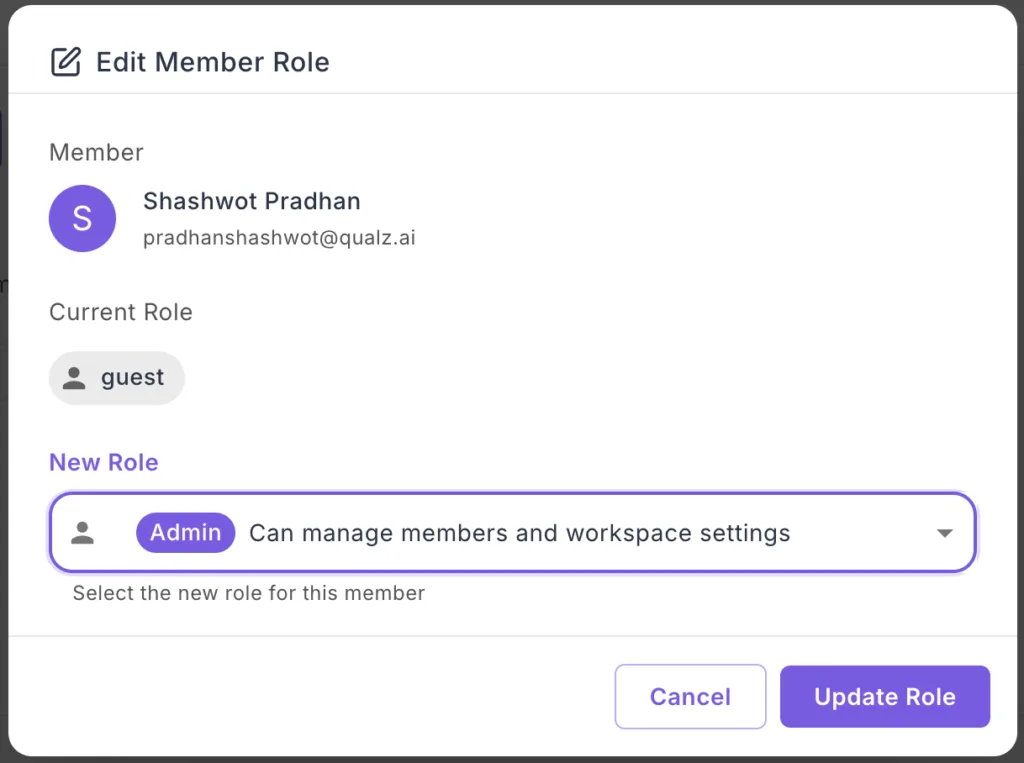
Confirm Role Change
- After selecting the new role, review the change
- Click "Update Role" button
- Or click "Cancel" to abort the change
- The role updates immediately upon confirmation
The member's role badge and permissions update instantly in the members list.
Step 5: Remove Members from Workspace
When someone no longer needs workspace access, you can remove them.
How to Remove a Member
- In Workspace Settings, navigate to Members
- Find the member you want to remove
- Click the "Remove Member" button with trash icon next to their name
- A confirmation dialog appears
- Confirm the removal
- The member is immediately removed from the workspace
What Happens When You Remove a Member
Immediate effects:
- Member loses all access to the workspace
- They can no longer see workspace data
- They cannot create or modify anything
- Workspace disappears from their Available Workspaces
Their previous work:
- Surveys and interviews they created remain in the workspace
- Analysis results are preserved
- All data stays in the workspace
- Ownership transfers to remaining Admins/Owner
Re-adding removed members:
- You can re-invite them anytime
- They'll need to accept a new invitation
- Their previous work remains available